Ideally I would have loved to recruit a more able sewer to create properly tailored outfits for both of our characters. However, as it is I feel I have adequate sewing abilities to make a passable abattoir uniform. The first thing was to source appropriate materials. Not only did we need a very small scale checked fabric (we decided to deviate from the all white uniforms we found pictures of), but it had to be a thin fabric, otherwise it would look far too stiff and heavy on our small scale characters. Thankfully, Boyes had a number of suitable options. However, with the white cotton we will be using for shirts, it may be necessary to use a double layer of material, to prevent the joints and foam padding from showing through.
Rather than trying to use a pattern of any sort, I constructed the costume in a similar fashion to how I attached the padding to the armature, by stitching and wrapping it tightly to the underlying structure, to emphasise the character's skinny physique. The one problem with this is that there are some parts to the costume which are quite tight and do not allow for much movement (where the trouser legs meet the hips, predominantly). I took this on board when constructing his shirt, taking care to allow plenty of freedom around his shoulders, as ultimately, I believe he will be moving his arms more than his legs. Had I spoken to someone with knowledge of costume and pattern cutting, this is no doubt something which would have been drawn to my attention.
As I previously mentioned, Fiona and I had some trouble deciphering the diagram of the fingers. I eventually made a passable attempt, looping the provided wire through the hand pieces, and twisting to add strength. It was quite hard to keep the fingers an equal length on both hands, so it is best not to twist the wire until you are happy with the lengths (bearing in ming that twisting shortens the length of the fingers, so they need to look a little long to begin with). After practicing on my own character, I offered to do Fiona's for her, as I was more confident with the technique and working with wire.
We had initially decided not to cast the gloves and boots with foam latex as we believed that it would be too time consuming. However, after trying to figure out an alternate technique, I now wonder whether it might not have been quicker and more simple to cast them.
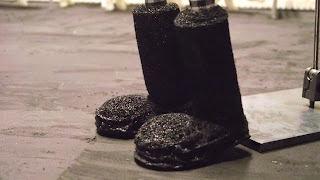
The challenge with the boots was to figure out a way of attaching the material to the foot plate, without affecting the character's ability to stand (as the fewer shots we have to edit the rig out of the better). My eventual solution was to use a foot shaped pad made of packaging foam and sew it to a cosmetic cotton pad placed beneath the foot plate. This would mean sacrificing the flexibility in the ball of the foot, but as our animation does not include and walk cycles, I think it is an acceptable sacrifice. I then wrapped foam over the character's calf to create the leg of the boot before stitching the two parts together and painting with a mixture of latex and acrylic paint, which adds a slight shine as well as helping hold the stitches in place.
The gloves were simply made from a dark fleece material, stitched tightly around the fingers and hand, and left looser around the forearm. It was difficult to completely conceal the wire fingers, as slight fraying to the fleece caused the wire to poke through on the fingertips. I should have allowed more material to cover the wire, so the stitches need not have been pulled so tightly.
At the beginning of the project, my major concern was how to enable facial movement and expression in the puppets. We had no way of creating geared heads like those used in Corpse Bride, and while one of our classmates was considering using a 3D printer to produce a small range of replacement faces for her puppets, this relied upon the co operation of Leeds Metropolitan University (college does not have its own printer at this point). As I was adamant that our characters were not having malleable (plasticine or clay heads) our remaining option was to sculpt and cast various different heads...a time consuming prospect.
While visiting Mackinnon & Saunders' studios, our guide happened to mention the puppets used for a short stop motion film called The Periwig Maker. Inspiringly, these puppets did not require replacements or mechanical heads...their expressions are fixed throughout the film. Only their eyes move.
Rather than detract from the audience's understanding or emotional impact of the film, the rigid facial expressions add to the sense of unease and disquieting atmosphere. While this is a technique which may feel out of place in a more comedic film, for our film which is just as dark in tone as The Periwig Maker (the gothic tale of a wig maker who isolates himself in plague infested London) this seems the ideal solution.
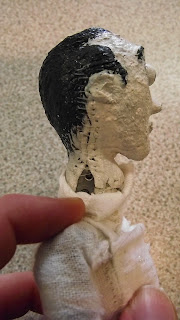
I was slightly concerned upon seeing the two character heads alongside one another for the first time that they were simply too different. To limit any further disparity between the two, it was decided that I should paint both of them using the same colour palette. After applying the first layer of acrylic mixed with latex, I was disappointed that the concoction did not act to smooth over any imperfections in the surface of the foam, as I had been assured that it would do. This could either be attributed to the fact that my mix was too thin (I tried to used equal quantities of paint and latex) or that there were just too many bubbles in the foam. Regardless of the reason, I was unhappy with the colour (the first coat was very pale, barely visible against the natural white colour of the foam) so decided to add more coats. The second layer came out too salmon pink, the third too grey and the fourth came out very blue.
A this point the numerous layers of paint had at least begun to fill in all the bubbles and pock marking on the surface of the foam, but I was still unsure about the colour. The characters had begun to look rather like zombies. While some of my classmates were positive about the blue tinge, Fiona and I felt that the colour was just a little too strong, so we applied a final thin layer of flesh colour over the top.
The next challenge was to attach the head to the armature. My plan was to cut a slit up one side of Gordon's head, before stitching it closed again around the armature. However, when modelling, I had neglected to check the size of the neck joints, meaning that my character's neck was just lightly too thin to accommodate the armature. Consequently, I had to make another cut up the other side of the neck, but even so, these are still areas where the neck does not meet on either side.
To cover and protect these lacerations, I chose to make Gordon's collar very tall. I also covered the stitching with a layer of PVA, in the hope of strengthening them and preventing the thread cutting though the foam where it had to be pulled tightly. While I could have painted over the visible stitching to try and conceal it, I am quite fond of his Frankenstein's monster quality. He also has visible stitching beneath his adam's apple, where I was rather over zealous when trimming the foam. In the future I will need to pay close attention to avoid making the same mistakes I have encountered here.
Unfortunately, the milliput eyes I had made and pressed into the plasticine model before making my mold were not a snug enough fit on the foam head, meaning that they would not be able to stay in place without adhesive (as it was too late to use magnets to hold them in place). While I had hoped that Gordon would be granted at least a little expression through his eyes, I chose to glue them in place, to avoid the inevitable frustration of them constantly falling out. Fiona chose to give her character vey small plasticine eyes, as the eyes she had sculpted in plasticine had fallen victim to air bubbles during the casting process.


No comments:
Post a Comment